Zingy Pinks

Bee sleeping in a zinnia flower.

The colours you tend to associate with late summer and early autumn are mostly reds, oranges and yellows. But there have been some really brilliant pinks around too.

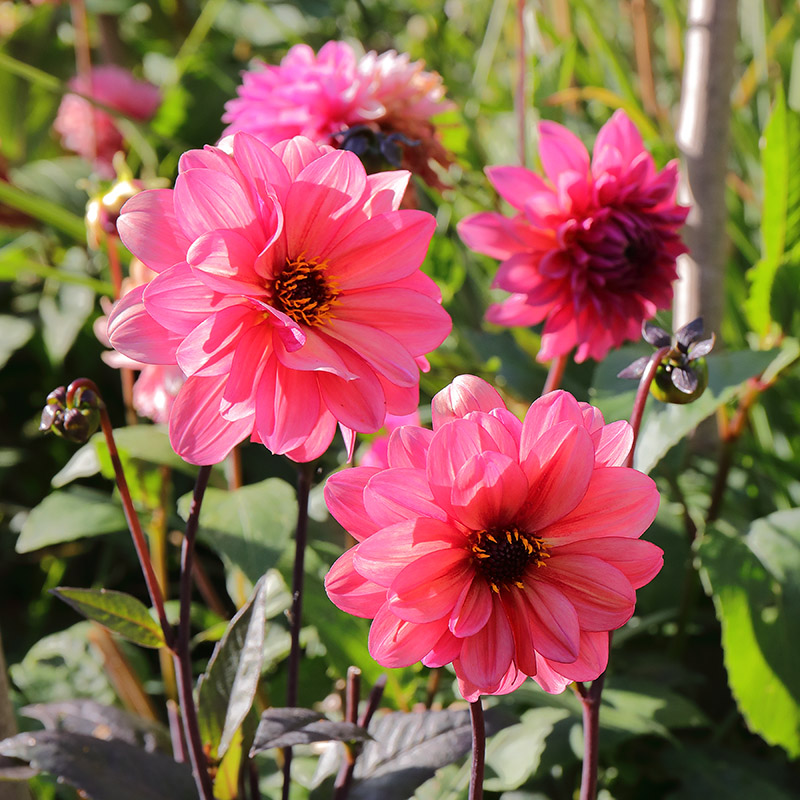
These pink flowers are not pale and delicate – instead they demand attention and can compete with any of the bright flowers around at the end of summer. (I love the softer pinks too, but they would get a bit lost at a time when so many of the other plants are shining so dazzlingly.)

Pink Alstroememria-2913
The rich colours of this alstroemeria add sparkle to garden borders.

Zinnias (top photo) are great to photograph – the colours are vivid and the central boss of the flower has plenty of intricate detail to add interest to the image. I’ve grown them when we lived in Scotland but not yet down here. (Here I’ve mostly planted perennials.) I really should plant some, because the garden gets lots of sun and they should be very happy in our well-drained soil.

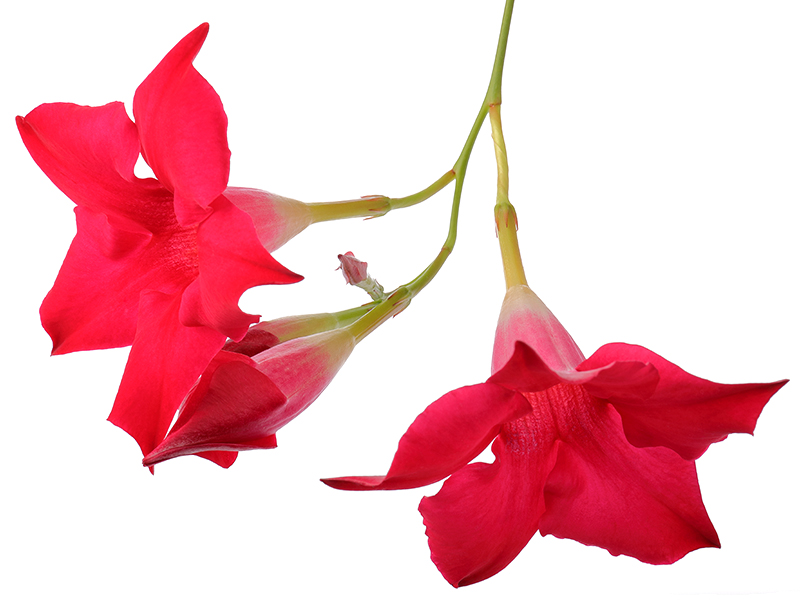
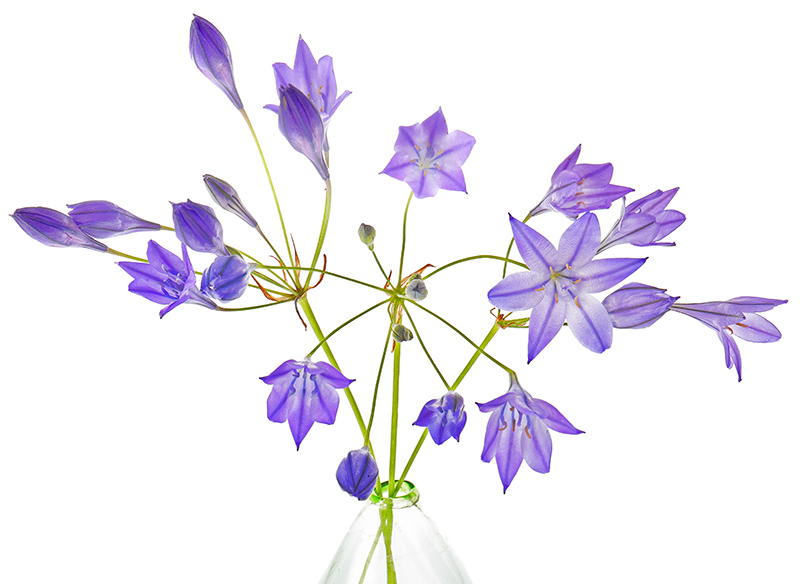
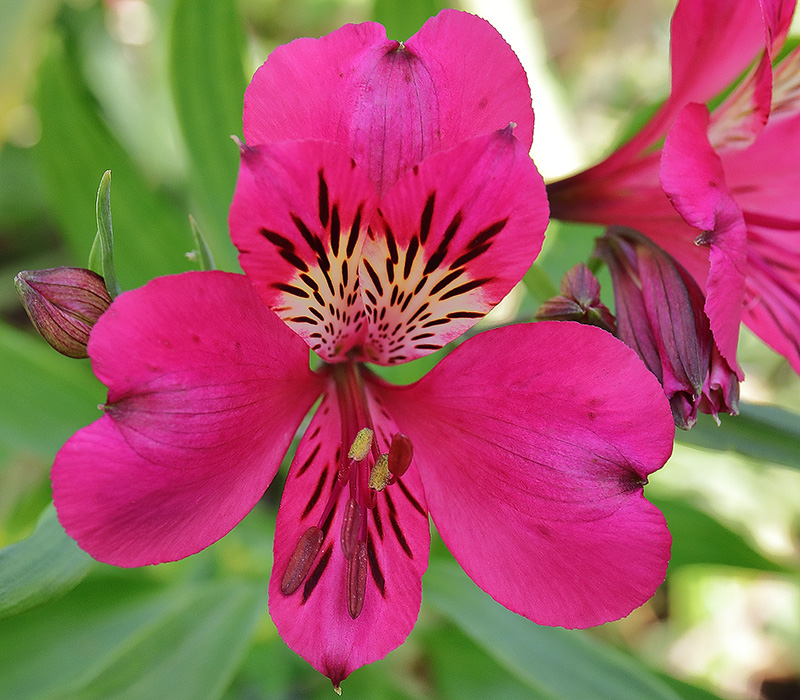
Alstoemerias are a satisfying flower to photograph, with their striking markings and depth of colour. They’re not common in gardens here, but I’ve started to see more of them in garden centres. Next year I’ll be tempted to give them a try, especially now that there are some hardier varieties that have a good chance of making it through the winter here. (I’d like to plant a deep pink one, as in the photo above.)

Pink echinacea flower
A slight hint of orange in this echinacea’s pink petals makes them more vibrant.

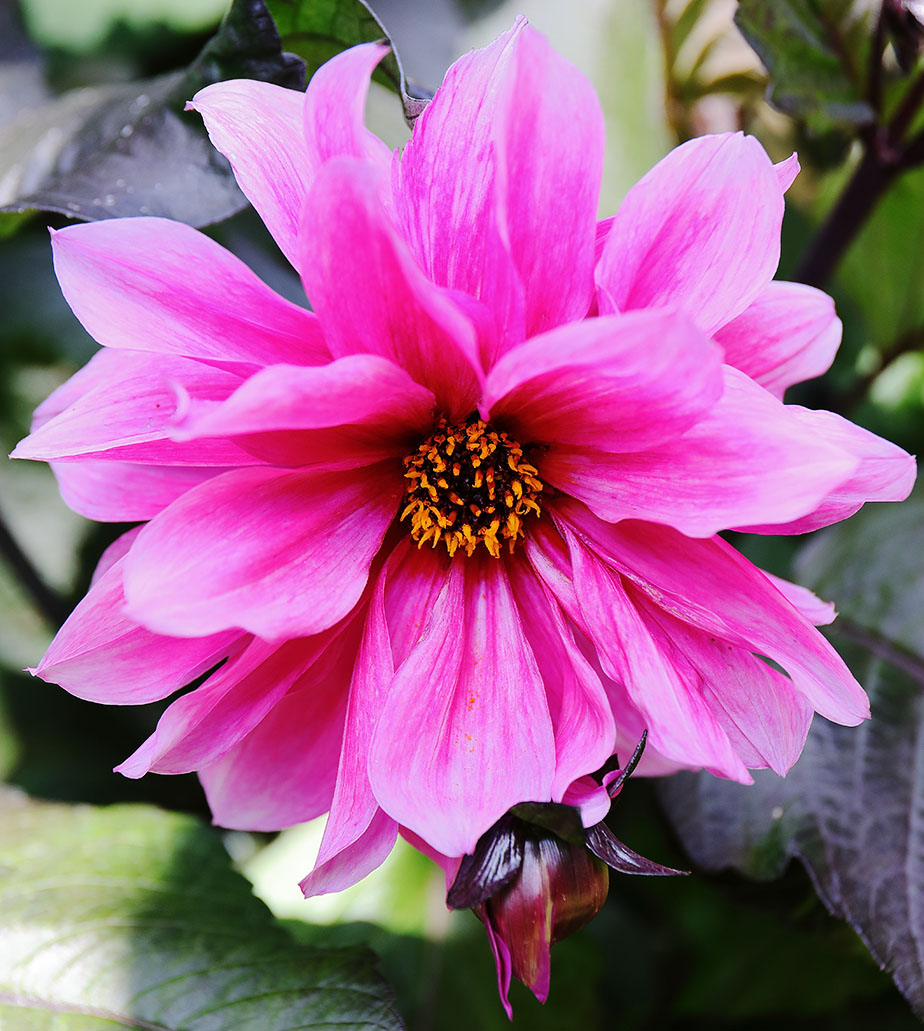
The echinacea above is one of a group that I bought from a nearby nursery, all in different colours. I think that they are getting used to  me coming in to look for something new to photograph! The echinaceas were fun – big, bold daisies with a lot of presence and very attractive colours. This one has just the tiniest amount of orange in the pink of its petals and that makes the colour shimmer in the sun.

My last flower is probably opening up to be more orange than pink – it would have been interesting to see the fully-open dahlia. But I loved it at this stage, when it was still partly folded up on itself and showing the pink reverse of its petals. The pink and orange together have a great feeling of energy, a really lively sizzle of colour that would add excitement to any border.

This year I’ve been lucky  enough to see lots of lovely plants while I’ve been out visiting gardens. They’ve given me a lot of inspiration for what I’d like to grow here and inspiration for photographs too. There will certainly be room in the garden for some of the more intense pinks!

Dahlia  Flower Opening
A two-tone pink and orange dahlia flower gets ready to dazzle.

Tropical Beauty: Rio Dipladenia

Rio Dipladenia

It has been raining heavily here for over a week. The garden needed the rain, but it has made planting spring bulbs and dividing up plants impossible for the moment. But, luckily, it hasn’t stopped me from photographing flowers.

When I first came across this dipladenia plant in a local garden centre, I thought it was a mandevilla, which I’d seen in books and magazines.

It turns out that the two are very closely related but different. Mandevillas grow taller than dipladenia, and will climb. Dipladenias, on the other hand, are shorter and bushier and will trail unless you train them to be upright. (They can also be recognised by their smoother, more rounded leaves – the leaves of mandevilla are narrow and comparatively rough.)

By chance, the ‘Rio’ dipladenia appears to be a good choice to grow here because it is small enough to grow happily in a pot in the conservatory. (They’re supposed to be good in a hanging basket too.)

Usually I’m quick to ask questions at the garden centre if I’m unfamiliar with a plant. I like to know that I’ll be able to give it the right conditions. But this time, I’ll admit, I just looked at the label and thought, ‘Oh, that’s exciting!’ So far, taking a chance has worked out well because the plant is still small but covered in flowers. That makes me a happy photographer, with something to keep me busy on a rainy day!

Flowers of Rio Dipladenia 'Hot Pink'
My impulse buy has worked out well!

Frothy Lace: Wild Carrot

Seedhead of wild carrot (Daucus carota).

Lacy, dainty flowers held on stems that curve inwards into a concave shape, both when the flowers are just opening and later, when the seeds are forming  – this is the wild carrot (Daucus carota).

If you live in the USA, you may know this flower as ‘Queen Anne’s lace’, but in the UK we also call it ‘bishop’s lace’ or ‘bird’s nest’. (You can see why, from the photo above.) Just to add to the name confusion, Queen Anne’s Lace is a name also used for an entirely different plant in the UK (Anthriscus sylvestris, aka cow parsley).

Daucus-Wild Carrot-Seedhead-3246
Here, the tiny flowers are still folded shut. As the flowers open, the umbel will become less concave and flatten out.

Whatever name you know it by, the wild carrot, in its white-flowered form, is often seen growing along the edges of roads and fields. In recent years, new pink and burgundy-flowered cultivars have been developed and the plant has become popular in gardens.

Here I grow it for the light, airy feel that it adds to garden borders. I’m also growing it to photograph. There’s plenty to inspire me: delicate umbels of tiny flowers contrasting with the almost spiky-looking bracts below them, colours ranging from palest pinks to deep, dark reds, and that distinctive ‘bird’s nest’ shape.

Daucus-Wild Carrot-2305
Open flowers of Daucus carota ‘Dara’

Photographing the flowers in the garden can be a bit tricky. The large, lightweight flower heads tend to move in the slightest breeze, so getting a reasonably sharp photograph can take a lot of patience! They’re worth the effort though, and I know that I’ll go back to them again and again for more photographs.

Next year, when I hope to have a larger number of the flowers in the garden, I will cut some and bring them indoors to photograph in the studio. No breezes there! (Apparently they make a good cut flower, lasting well if you sear the stem ends in boiling water for a few seconds.)

Right now, the seeds of these plants are ready to gather. So I will collect them – some to sow now and some to sow next spring – in the hope of having lots more of this delightful plant.

Daucus-Wild Carrot-Seedhead-3246
The newly-emerging wild carrot flowers in springtime.

Rich With Colour: Dahlias

Pink dahlia flower

This year I’ve been trying to extend the flowering season in my garden a little. So I’ve planted echinaceas, heleniums, rudbekias and asters, which helped to keep the garden going through the transition into autumn.

But I’ve been missing out on one of the best flowers for this time of year – the dahlia.

Dahlias-pink and white 3059
These little dahlias are quite cute!

As a newcomer to dahlias, I find the choice of flowers quite bewildering. There are so many different types to get to know…cactus, semi-cactus, ball, pom-poms, anemone-flowered and more.

So far, I’ve decided that I like the peony-flowered and single dahlias the most because they have open centres (great for bees). The collarette dahlias are really interesting to photograph because they have two rings of petals – the large outer petals and a sweet little ring of twirly mini-petals around the central disc. (You can see one in the top-left corner of the photo-mosaic below.)

So far I’ve just planted two dahlias here. One is ‘Siberia’, a white, waterlily-flowered dahlia which you can also see in the mosaic below. The other is a seedling of ‘Bishop’s Children’ which has flowered in a rich bright red. That’s a small start, but next year I’ll be on the lookout for more.

Dahlias-8up-A
Some of the dahlias that I’ve photographed recently.

As usual, one of the biggest factors in my plant choices will be finding flowers that will make good photographs. Dahlias have a huge range of colours and shapes, so choosing will probably take some time.

For photography, I often look for flowers that have one colour with another blushed over them, or a different colour along the edges of petals, because it gives an interesting element to the photograph.

Shapes within the flower are important when photographing it too. Elegant curves, contrast of size and shape and interesting small details are all essential parts of a satisfying flower image.

Dahlia-red-3077
The brightest of reds.

I can foresee a slight snag with my new interest in dahlias. It’s going to be hard to restrict myself to the plants I actually have room for! Well, that will be a problem for next year. This year I must get on and improve the soil in the borders for them. And I’ll start working on my dahlia ‘to buy’ list, while dreaming about the wonderfully rich colours that they will bring to my garden…

Dahlias-pink-3104
A dahlia that I’d love to grow.

Tougher Than it Looks: Hibiscus Syriacus

Hibiscus Blue Bird

Like many, the first time I saw hibiscus flowers was while on holiday in Spain. These were the red Hibiscus rosa-sinensis – flamboyant and very exotic-looking flowers that will always remind me of my parents’ garden there.

My parents had retired to Spain and spent over 20 years living there. On visits to them, I enjoyed looking after their little garden and visiting the nearby garden centre to buy plants for it. It was an exciting world of unfamiliar plants where I could have easily wandered for hours. (Nowadays those plants have become much more commonplace and are easily bought in UK garden centres.)

The Spanish garden centre was just a few minutes walk from my parents’ apartment, so a visit there became a frequent entertainment. (And it was a great place for buying gifts for my flower-loving mother.) My eye was often draw to the hibiscus plants there – both the usual red cultivar and the others that had flowers in a range of pinks, oranges and yellows.

White hibiscus flower
This white hibiscus is much less showy than those with the red markings and it seems to be shyly hiding under the leaf!

Living in Scotland at the time, I had no idea that it was possible to grow hibiscus in the UK. It was only when I moved to Suffolk that I came across the hardy hibiscus shrubs (Hibiscus syriacus) and fell in love with them.

‘Blue Bird’ was one of the first of the hardy hibiscus that I came across and it’s flower colour has made it my favourite. These flowers vary from a quite definite blue, to a softer, more lavender shade. This is can be due to the flower aging, but can also be dependent on whether the shrub was grown from seed (very variable) or from a cutting. (I’ve read that hibiscus seedlings can be a nuisance in parts of the USA, but that isn’t a problem in chilly old Britain!)

So far I have two hibiscus shrubs in the garden – Blue Bird, which has flowered abundantly this year, and a young plant of ‘Walburton’s Rose Moon’. This second hibiscus has massive flowers that open to a much flatter shape than the more cup-shaped blooms of Blue Bird.

A white hibiscus would look good in a new area that I’m planting up – probably ‘Red Heart’ which has showy red markings in the centre of its flowers. Another possibility would be the much more restrained plain white cultivar (above), seen in a nearby garden.

The hibiscus flowers are almost over for this year (there’s just one pink one left), but I’m already looking forward to being able to spend more time photographing them next year.

Hibiscus Rose Moon 2615
Hibiscus Walburton’s Rose Moon

A Rediscovery: Triteleia Laxa

The blue flowers of Tritelia laxa 'Queen Fabiola'

Occasionally I come across something in the garden that I had pretty much forgotten about.

That happened last year when I was starting to clear an area of the garden that had become overgrown with too-rampant plants. (I have quite a few of these!)

I was delighted to discover these pretty little blue flowers – Tritelia laxa – still managing to survive, despite the tide of geraniums, Japanese anemonies, ivy and assorted weeds that was threatening to engulf them.

I haven’t seen them very often in the UK. Perhaps that’s because they are not thoroughly hardy and don’t like getting very wet in winter. Luckily for them, my soil is very well-drained and I guess that the weeds etc. have been protecting them from the winter cold.

Triteliea growing in a garden.
These triteliea flowers have managed to survive and multiply in a rather neglected corner of my garden.

The flowers used to be known as Brodiaea and you can still find the corms for sale under that name. They have several other names too, but the one that intrigued me is ‘Ithuriel’s Spear’. So I had to Google it…

Apparently, Ithuriel was the name of an angel who had a spear that could unmask any disguise by its touch. According to the poet Milton, he was sent to the Garden of Eden, where he used the spear to discover Satan, who was hiding in the disguise of a toad. (You can see that this must come from the sharp-looking tip of the flower bud somewhat resembling a spear.)

So now, as a result of that strange association I’m imagining myself wandering around the garden, trying to touch the frogs (haven’t seen any toads here) with a tiny blue flower. Somehow I don’t think they’d be too impressed! (Nor would the neighbours!)

Plant names seem to belong in a strange world of imagination and fantasy – but they can be amusing. And now I must go and take some more photographs of my rediscovered little beauties…

Triteleia laxa (also known as Brodiaea) 'Queen Fabiola'
Tritelia (aka Brodiaea) makes a great cut flower.

Elderflowers: Pink Fizz

Pink elderflowers

Time moves fast in the garden. One moment a plant is in full flower and the next it’s covered in seedheads or berries.

This year especially, with so much new work to do in the garden, I’ve been finding it difficult to keep up with all of the plants and flowers that I want to photograph. Sometimes I leave a plant too long and then find that the flowers have gone over before I get near them with my camera.

A few days ago I realised that the flowers on our bronze elder were almost gone and I really didn’t want to have to wait a year to have another chance.

Having chosen one of the last few flowers, I decided to photograph it indoors. This was the easiest way to get a sharp image. It has been quite breezy here recently and it takes very little to make the elder’s long branches sway – so not much chance of being able to focus on the flowers!

Of course, I could have collected some of the flowers to make elderflower cordial or ‘champagne’. The flowers can even be fried in batter to make fritters. Or the flowers could be left to produce berries for making an elderberry syrup.

(The syrup really doesn’t appeal to me because the berries contain cyanide and other toxic substances. These are destroyed in cooking, but  I still wouldn’t fancy chancing it!)

Other parts of the elder tree also contain cyanide, which may be behind the superstitious belief that burning the wood is unlucky.

There are many old beliefs surrounding the elder tree. These are a strange, inconsistent mixture! One one hand, it was said that if you burned the wood, you would see the devil but on the other hand, having the elder planted near your house would keep the devil away.

In early times, the elder was thought to be a protection against witchcraft and evil spirits but by medieval times, it was reckoned to be both the wood used for Christ’s cross and the tree on which Judas hanged himself.

Well, there’s no confusion for me. I simply enjoy the pretty flowers while they last and the beautiful lace-like leaves and dark berries too.

Flowers of Sambucus nigra 'Black Lace'-2121
The tiny pink flowers can be used to make elderflower cordial or ‘champagne’ – and it will be pink!

Summer Scents: Philadelphus

Philadelphus Coronarius flowers

As a photographer, it would be easy for me to forget that being in a garden is not just a visual experience.

Scent is something that I tend not to think about until I am greeted by an unexpected waft of perfume from some nearby flowers.

For the past few weeks, a shrub in my neighbours’ garden has been flowering magnificently and leaning right over the fence into my garden. It has been a most welcome sight, but, beautiful as the flowers were, their scent was even more impressive. Strong and sweet, this scent has been filling the air near our back door and has made it a pleasure to step outside.

The shrub is a philadelphus or ‘mock orange’. I’m guessing, from its strong perfume and height (about 9-10 ft.) that it is likely to be Philadelphus coronarious. (You can see it in the top photo.) It has just finished flowering and now the two philadelphus shrubs in my own garden have taken over.

White philadelphus (mock orange) flowers
This Philadelphus was in the garden when we came here – I think it’s probably ‘Virginal’.

In the photograph above, you can see the older of these. I think it has been in the garden for a very long time and it was terribly overgrown and straggly when we arrived. I cut it back a lot and it has grown back strongly.

Despite now having quite a lot of shade from nearby trees, this philadelphus is heavily covered with flowers but their scent is not as strong as those on the neighbours’ shrub. By the look of it, I think that this one must be the cultivar ‘Virginal’ – it was one of the commonest ones. (Nowadays, there seems to be a very large number of cultivars available.)

In contrast, I do know the name of the philadelphus in the bottom photograph. It is ‘Belle Etoile’  – I’m sure, because I planted that one!

(Not knowing the full names of plants that you’ve ‘inherited’ or else photographed in other people’s gardens makes titling photographs accurately very difficult.)

Belle Etoile seems to have less scent than the others, however, it makes it up for that with the pretty purplish colouration at the centre. This makes it attractive to photograph, as well as blending it nicely with its dark pink and purple flowered neighbours in that border.

I’m enjoying the company of these lovely shrubs at the moment – what more could a flower photographer ask, than a beautiful subject that also happens to smell good while you’re working up close to it. Sweet!

Flowers of Philadelphus 'Belle Etoile'
Philadelphus ‘Belle Etoile’ has a magenta blush at the centre of the flower.

Glorious Green: Ferns

A tightly-curled young fern frond.

By this stage of winter, the idea of lush green growth is tremendously appealing. It’s easy to dream of densely-planted borders bursting with re-emerging life – new shoots, unfurling leaves, and buds that swell with the promise of flowers soon to come.

Amongst all this imagined greenery, ferns would be an excellent addition. Their finely-cut fronds would contrast well with larger, more solid leaves and would bring their delicate textures and a subtle feel of pattern to the border.

Hairy reverse of young fern-frond.
The young fronds are very hairy on the back. They look almost furry!

For photography, ferns make an excellent subject. There’s lots of pleasing detail, especially in the new foliage. The tightly-wound curls of the young fronds are especially photogenic and the outside surface of the curl (the back of the frond) can be surprisingly hairy and looks soft to touch.

(Saying that has made me realise that I didn’t actually touch them. I could have put out a finger to stroke the back of a curl, but I didn’t. Perhaps I should have. Taking photographs can absorb you so that you forget to interact with plants – or a garden – in ways that you would do, if you were walking around without a camera. So maybe I need to leave my camera in its bag for a while and explore the garden, before I start to take photographs.)

Fern leaves.
Fern leaves can add some texture and pattern to garden borders.

In my real garden (as opposed to the imaginary borders where anything will grow), it is too hot and dry for most ferns. The Male Fern (Dryopteris filix-mas) is reckoned to be able to cope with drier conditions than most, but that is if it’s in the shade. Most of our garden gets a lot of sunshine, but there is one area that is shaded by the house in the afternoon. Now I am wondering if that bit of ground might be suitable for making a bog garden and I’m imagining the other moisture-loving plants that would also be happy there. (Though there are ferns that don’t need such damp soil.)

If I do go ahead with this idea, the beautiful green growth of ferns would be a very satisfying reward. (Meanwhile, my imaginary garden is flourishing!)

Fern fronds with curled tips.
The curly tips of the fronds of this fern look unusual.

Translucence

Yellow tulip back-lit to show detail of petals

One of the ways I like to photograph flowers is to light them from behind. It brings out the translucent nature of the petals, allows the colour to glow, and shows up details that you wouldn’t see under normal front-lighting.

In the photograph of the yellow tulip above, I wanted to show the delicate lines of the veins in the petals. Without the back-lighting, they would have been pretty much invisible, but here, with the light coming through the petals, they are much easier to see.

The layering of the petals where they overlap one another creates areas of varying shade and this helps to give emphasis to the petals’ curving shapes. It also creates variations within the yellow of the tulip – more interesting, I think, than the flatter tones I’d have got if I had just lit the flower from the front.

Clematis lit to exaggerate the colour

While the yellow tulip was photographed to give a realistic image, the green clematis above has had its colour exaggerated by the lighting and it was then saturated a bit more in Photoshop. If the flower petals are thick enough, the light from behind can make the colour appear richer. However, if you give this technique a try, you’ll find that the results will vary with the strength of the light coming through the petals and how much the petals themselves allow light to pass through. If you use a flower with very thin petals, the colour may become much lighter and you could instead create an image with very soft, delicate colours – a lovely effect.

I can’t remember the name of the clematis below (this one grew in my garden in Scotland), but I hope I’ll find the same one again because these pinky-purply shades are among my favourite colours.

In this photograph, the petals on the left-hand side have the light coming through them from behind but the right-hand petals are lit from the front. That was because I wanted to light the centre of the flower to capture the detail there. As a result, the veins of the petals on the left show up very clearly, but the petals on the right have a much more solid appearance and you can see the slight magenta marking on the petal’s midrib.

Translucent purple clematis

A set-up like this is very easy to do if you can find a lightbox of the kind that’s used for viewing slides and negatives. These boxes have a translucent ‘opal’ top surface with daylight-balanced light tubes behind. All you have to do is lay your flowers on top and add some soft light to the front of the flower if you want to show the detail of the stamens etc. (Otherwise they would be likely to be in silhouette.) For the frontal lighting, you need to make sure that it isn’t too strong, otherwise it would drown the effect of the back-lighting. Soft, overcast light from a window would be the easiest thing to try.

If you try this back-lighting technique, remember to check that the light isn’t making your flowers hot and wilting them. You can always take them away from the lights in between shots, even give them a rest in some water for a while.

Comments are always very welcome – please feel free to add yours!